Classroom Decor: Back to School Organization 101


Hey, hey teachers!!!!  It's summer and you are loving life, relaxing, enjoying all the free time you have.....except, let's be honest, all you are really doing is scowering Pinterest and Instagram to find pictures of classrooms and thinking about how you will decorate your classroom when it's time to go back to school.  It's one of the best and worst things about being a teacher -- we love our time off, but we just cannot turn off the teacher brain.  As much as we try to check out, it's still so exciting to plan and prep for a new school year.

If this is your first year teaching....Congratulations!!!  Such a huge accomplishment to now have your first classroom.  And if it's your 30th year teaching....that too is a HUGE accomplishment.  Whichever point in your career you are at, decorating a classroom can still get very overwhelming and also very costly.  Personally, this will be my 17th year teaching. 😳  It's so hard to believe it's been that long because I still remember setting up my first classroom like it was yesterday.  And since that first one I have been in 4 different schools and 8 different classrooms, so I have had to start from scratch 8 different times.  It is certainly exhausting, but to be honest, I really love having a blank slate to work with and changing things up from time to time.  I see a new classroom as always so full of potential.  Having said that, I am suuuuuuper relieved that I am now in a classroom that I think I will be staying in for a while and I don't need to start all over again (unless I get that itch to move again). 😉

So my purpose for writing this post is to share some of the things I have learned over the years and through the many classrooms I have decorated.  This post is dedicated to deciding how to decorate the walls and bulletin boards of your classroom.  I will have more posts in this series about organizing teacher supplies and students supplies, so check back to see those.

Classroom decor

Now let's get started with a few things to think about when searching for decor to put up on your walls....


1.  As much as I love cute trends like pineapples and unicorns and would have so much fun filling my walls with all the adorable decorations that are out there, my first tip is to keep your decorating PURPOSEFUL.  What will you and your students refer to throughout your days?  What resources will help you teach?  What resources will help your students learn and complete their work?  If the only reason you're hanging it up is because it is pretty....don't!

2. You DO NOT need to fill every inch of wall space that is in your room.  Do not make your walls so busy that your students are overwhelmed and can't find anything they are looking for anyway.   Use the bulletin boards that you have and some of your wall space, but plan for some "white space" to let the eyes rest and to break up the different areas of your room.

3. Let your curriculum help guide what you hang on your walls, but don't try to put everything they will be learning on the walls from day 1.  Leave an area where you could hang anchor charts you create together or vocabulary for a unit you are doing when you get to it.  Allow your students to have some ownership over some things that go up.  In my district we do not have to post standards or  daily objectives, so I don't do that since my first graders (now my kindergarteners) can't read them anyway so who were they really for.

4. Don't forget to make spaces that will make the students feel that they are a part of this classroom and the classroom was made with them in mind.  I hang up a birthday chart and a Star of the Week bulletin board.  I also try to leave spaces for student work to be displayed.  They will be spending about 1,000 hours in this classroom throughout the year --- you want it to feel like a special place to be!

Here are some of the items that I know I personally need in my classroom when I have taught Kindergarten and First Grade along with a few pictures of some of my previous classrooms.  Click HERE to download a FREE K-1 Classroom Decor checklist to use yourself as you think about what you will hang up in your classroom.

  • Calendar bulletin board that includes: monthly calendar, days of the week, months of the year, number of days we've been in school, and some other math resources that we use during morning meeting like number posters and a 100 or 120 chart (or sometimes I used a 180 chart if I had the room to count all the way through the year).  I try to keep this bulletin board right at my carpet area so we can go through it each morning together. 

Calendar bulletin board

This next classroom was very limited on bulletin board space.  I only had two small bulletin boards in the front of the room, so I had to split up my calendar and math resources.  You can also see in this picture that I hang up a visual schedule for the day as well.  We go through the daily schedule each morning.

100 chart

This is my current Kindergarten classroom.  You can see I moved the number posters off this board and added in some ten frames that we use along with the straws to count how many days we have been in school during our morning meeting.  I will show you where the number posters have gone when they are not on my calendar board.

Calendar bulletin board

  • Word wall - I have had to get creative with my word walls over the years.  In some classrooms I would have a large bulletin board where I could put my word wall, but in my last 2 classrooms I have not had the space so I used the cabinets and some bright laminated cardstock.  I actually like the cabinet word wall the best!
Classroom Decor

Classroom decorword wall

Here is my current classroom.

word wall Classroom decor
  • Alphabet - Depending on the letter formation you are responsible for teaching, it is important in a K-1 classroom to have an alphabet posted.  I like to have mine right in the front of the room above the board.  
Alphabet posters

Classroom decor
  • Math resources like a Number line and Number posters - I find that K-1 students need to see lots of different representations of numbers and how to use those to help count.  I hang up a classroom number line that I made that is color coded by tens so students can visually see each group of ten.  
Classroom decor

Number line

And here are the number posters I hang up.  This first classroom had a large space on the wall that I used.

Classroom decor

This is how I had them the last two years -- on part of a bulletin board in the front of the room.
Number posters Number posters

And for this upcoming year I have moved them below my board in the front of the room so children can come right up to them and count on them.
Number posters

  • Rules - I do like to create a classroom constitution in the beginning of the year, but inevitably these are the main rules we all come up with together anyway.  The reason I think it's important to post rules is because I refer to these often when there is a behavior problem.  When I speak with a student, I remind him/her of the rule that he/she is having a hard time with and what can be done to improve.  It's always easier when there is a visual to refer back to.  Remember though, you want your decor to be things you refer to and use, so if you post rules then try to refer to them from time to time so they have a purpose for being on your wall.
Classroom decor
  • Lunch count and/or attendance - This varies from school to school, but here is what my lunch chart looks like.  Students use clothes pins to make their choice for the day.  I do not have an attendance chart on the walls because I use the lunch chart as a way to quickly take attendance.
Lunch count chart
Star of the Week bulletin board

  • Space for student work - I don't have a bulletin board in my classroom for student work, but I do have them in the hallway.  Typically I will hang student work from the ceiling (if I'm allowed because of fire code) or on the windows in my current classroom. 

  • Other - Depending on the classroom I have put other things up on our walls if there was space and if it fit with my intentions, like this reading strategy bulletin board I had behind my guided reading table.  I referred to this often as we would read, so it was definitely useful.  Plus, my first graders LOVED the beanie babies!!!

Reading strategies bulletin board

I also had this Amazing Sight Word Race track up in one of my first grade classrooms that had a ton of bulletin boards (and only one tiny window, so that's probably why).  I used this as an incentive to learn sight words throughout the year but since it was going around the track multiple times, the kids didn't always know which lists the other students had mastered - they were only racing themselves.

Classroom decor

And finally, I do like to have at least one space to talk about kindness, character ed, or bullying.  I really like this poster paired with some Melonheadz kids so I have this in a little space on my wall in my classroom right now.  I know what you're thinking - I should have kept it as white space, and you might be right, but I really enjoy watching the kindergarteners throughout the year as they learn to read what this poster says and hopefully put it into practice.  

Kindness poster

I hope this was somewhat helpful for you as you are deciding what to decorate your room with.  If nothing else, it's always fun to see pictures of other classrooms and see how other teachers decorate.  Then you have to find a way to combine what you like with what you see and what you can afford and how much room you have on your walls.  What works for one teacher doesn't always work for another one, so I am just sharing what has worked for me over the years.  If you are interested in any of the decor you saw here, here a few links for you to check out:

Polka Dot classroom posters

Classroom decor

Sight word bulletin board, games, activities, worksheets


Happy decorating!!!

If you are looking for more tips for Back to School and Classroom organization.....check the next post in the series: 4 Tips for Organizing you Teacher Supplies.   Sign up to receive emails when I make a new blog post to see future posts about organization as well.


Get the Most Out of Your Planning Time

Hi there!  I'm here to share a little something that took me 12 years of teaching to fine tune.  It's not something you would necessarily think would take 12 years to figure out, but some of us are a little slower than others.  ;)

So what I'm talking about is this:

In my 12 years of teaching I have ALWAYS brought home work to do.  Every. single. day.  It's not that I haven't been also working during my planning period, but somehow I would spend that time going from one thing to the next, really only accomplishing small tasks while the bigger ones would need to be taken home.  I can't be the only one who falls victim to this.  

So this year it got to the point that I just couldn't be bringing so much home anymore.  Mostly because I would inevitably not have enough time to do it all and have to bring it home again the next day.  My school bags were getting to go for some nice rides in the car.  

Well, not anymore people!

This year I decided to make a schedule for myself in order to stay focused during my oh-so-short 40 minutes.  Here is how I decided to split up my week:
It's not groundbreaking - I know.  In fact, some first year teachers might have already figured this out.  But like I said, I tend to get distracted and really needed something to keep me focused.  

Here's a little more detail for my reasoning in my schedule.  

In my district we send out our copies to a copy center in the district and it takes about 2-3 days for them to come back.  I wanted to be sure they would be back in time so I send them out on Monday and then they are back by Thursday.  

Tuesdays is my day to grade papers.  I had to make one day for this because I really don't enjoy it and don't want to do it everyday.  

Wednesdays is my day for writing out my plans.  I can't do this too early in the week because I need to know how things are going in my current week to get a sense for what I can plan for the following week.  

Thursday is my day to catch up on parent contact or really any communication about students, whether it's paperwork or talking to service providers.  

And finally Friday I am ready to organize my papers and materials into my Monday through Friday bins for the following week.  I switch out my centers too.  

Don't get me wrong, I do still bring home work sometimes, especially when it's cutting out laminating, but this little schedule has helped so much.  

So now it's your turn to tell me how much smarter you are than me how you get the most out of your planning time.  What works for you?  I'd love to hear.  

Thanks for stopping by with me again.  


Not Your Normal KWL

Hi there!  I don’t know about you, but when I went to school to become a teacher I was told that the KWL chart was one of the best ways to begin learning about a new topic.  It accomplished the task of activating prior knowledge, had students asking questions and setting a purpose for learning, and then they recorded any new information that they learned.   I still think a KWL chart is extremely useful and can be very meaningful for students, but I have personally found a new way of beginning units and I don't think I will be going back - a Schema Chart.  
*The idea for this cutie penguin chart came from the very talented Cara Carroll*

Here’s why I love me some schema charts: When students share what they “know” about a topic on a KWL, sometimes they are not correct.  For example, Penguins can fly.  As a teacher, what do you do when that happens?  Do you tell them right then that they are wrong or do you write the incorrect information on the KWL only to have to cross it off later?  I never liked that decision because I didn’t think either one was a good solution to the problem.  I didn't want to ruin the discovery of learning and I also didn't want to knock down the children who were brave to volunteer information only to tell them they were wrong.  That child will never raise his/her hand again after that.  But by using a Schema Chart you don’t have to make students feel bad anymore and you can let them DISCOVER their own misconceptions while learning.  

We begin each unit by sharing all of our schema about the topic we are about to study.  I use post-its so we can easily move them around later if we need to.  When I first introduce the terms SCHEMA and MISCONCEPTIONS I explain that schema is what we “think” we know about a topic. Sometimes we “know” something and then realize that we didn’t have all the facts.  This is called a misconception.  I’ll say something like: “Is it ok to be “wrong” when we really thought we knew something?  Of course - it happens to the best of us!  Is it fun to be wrong?  No, but in our classroom we don’t make anyone feel bad when they get an answer wrong.  It’s all part of learning.  None of us, including me, knows everything there is to know, so we won’t make anyone feel bad if they had a misconception.  We just move our ideas over to misconceptions and write down some of our new learning.”  Give them a quick explanation of how we will handle misconceptions and how that is all part of the process of learning.  Of course, it’s all in the way you, as the teacher, deliver it.  


The next two parts of a schema chart are the same as a KWL - QUESTIONS and NEW LEARNING. We think of questions we want answered and as we move through the unit we add new learning to our chart.  And again, we move misconceptions over as we discover our new learning.  

When I started using schema charts to begin my units I  really saw my 1st graders using the language of schema and misconceptions.  I heard them support each other when they learned they were wrong and say, “Oops, that was a misconception!  Now we have some new learning!”  It really was a great thing!  

Now,  you can make your charts look cute and more engaging like my penguin or reindeer, which of course take a little longer.  
Or you can just use a piece of chart paper with columns for each part.  Personally I like the visual, but sometimes I don't have the time or might forget to prepare my charts ahead of time.  Here is one that I did on the fly about 5 minutes before we started learning about The First Thanksgiving.
The kids were eating snack while I was making it and it was actually so fun for them to see me put this together and talk about what they thought we would be doing next.  Bad teacher planning on my part, but it did spark a bit of curiosity.  

After I realized how much I really loved using schema charts to begin my units, I created a little pack called Be a Fact Finder that I could use with ANY nonfiction unit.  


It includes chart pieces and a student component of the schema chart, as well as tons of other activities that can be used during whole group or guided reading and writing.  My favorite are these Stop and Think bookmarks and signs.


Click HERE if you want to check this pack out in more detail.  

I would love to hear any other ideas you have for sparking interest and activating prior knowledge when you begin a new unit.  Comment below and share :)

Have a wonderful holiday!!  


Plants Lapbook

Part of me has always wanted to try interactive notebooks.  But being a first grade teacher and now kindergarten teacher I just know I do not have the time to dedicate and really be able to feel as though it's not time wasted on cutting and gluing.  The management of interactive notebooking seems like more than I want to bite off with my little learners.  I can just picture my class cutting things all wrong and having pages all stuck together.  

On the other hand, when they are done correctly don't they just look so cute and fun.  I'm positive there are teachers out there who rock at INB's.  Unfortunately I don't think I am one of those teachers, at least not yet.  Maybe in the future.  

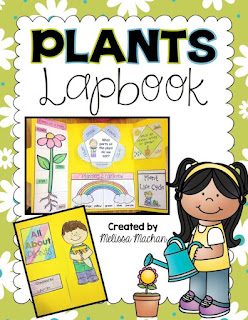
For now though, I've discovered and fallen in love with lapbooks.  These are a smaller version of interactive notebooks that focus on one topic or theme.  They seemed much more manageable for me and I really loved the final product.  After seeing a few of these out there, I decided to make one for us to use for our plants unit.  


This was so much fun to create, and even more fun for both my students and me to work through together.  I tied each piece of this lapbook into a fun picture book to guide our lesson.  Essentially this project takes about 6 days and was definitely appropriate for my little kiddos.  

First, we read the book Splat the Cat: Oopsie Daisy by Rob Scotton.  I love Splat books and this one is a nice quick intro to plants and what they need to grow.  We used this quick foldable to list the things they need.  This was an easy way to get the project started.  


By the way, I think I forgot to say that I used colored file folders for this project.  Before we began I folded all of the folders so they were ready to go.  You could also use 11 x 14" construction to make these too. I like the folders because they are more sturdy and can stand up to be displayed if you want to.

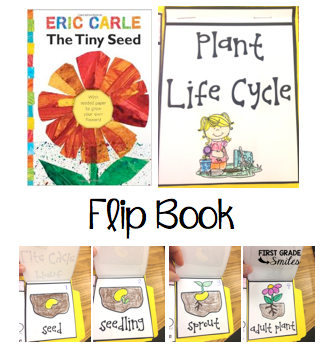
The next day we read the book The Tiny Seed by Eric Carle and then created this little flip book to put inside our lapbook.  There are a couple different options of the stages on the life cycle depending on how you'd like to teach it to your students.  The students color, cut, and put the stages in order before we staple them together into the lapbooks.  


On Day 3, we jumped into learning the parts of a plant by first reading From Seed to Plant by Gail Gibbons.  We then completed this foldable where the children had to cut out labels for each part and then fill in the purpose of each part to glue under the flaps.  


On the 4th day we read this adorable book called Tops & Bottoms by Janet Stevens.  The kids loved this book the most I think!  Then we started talking about how we all eat plants even if we didn't realize we do and how we eat all the different parts of the plant too.  I made this chart to help them in their thinking when they completed this flower-shaped foldable.  


For Day 5 we finished by thinking of plants and flowers of all the different colors of a rainbow.  Again I read a great book called Planting a Rainbow by Lois Ehlert and made a chart to keep track of what we came up with. I had the children choose one plant for each color, write it under the flap and draw a quick picture too.  We colored the rainbow on the front of it before making any of the cuts - just a quick tip since it's harder to color when the cuts are there. 


Finally on Day 6 we added the cover pieces.  You could choose to do this part first if you'd like.  There are boy and girl pieces for the cover for you to choose from for your students.  


I loved this so much that I really want to try to find or make more lapbooks for my class to use.  It was such a fun and interactive (obviously ;) way to teach.  If you want to try it out in your classroom, click on the picture below to head over to my Teachers Pay Teachers store.  


And maybe someday I will be ready to jump into the world of interactive notebooks.  But for now, I'm loving lapbooks!

Hope you enjoy it too!


Learning about Rabbits


Teaching holidays and themes has always been something that I have loved about teaching at the primary level.  The children get so excited and frankly a little crazy in the weeks leading up to any holiday, vacation, full moon --- pretty much everything --- am I right?  But tapping into that excitement when planning my lessons is what makes teaching so much fun!  What teacher doesn't want their students excited about what they are learning and motivated to do the work?  I don't know any.

The tricky thing about teaching themes is that holidays can become a touchy area in some schools in order to respect the diversity of its students.  Every school is different and every group of students is different so it could likely change from year to year.  But then the reality is that you have these giggly, wiggly, little cuties who cannot possibly contain their excitement about an upcoming holiday and it's hard to get them to think about anything else.  For this reason I try to plan lessons where I can teach about the holiday without teaching about the holiday.  Around Christmas time I love to teach units on Reindeer and the Gingerbread Man.  My students have always loved these units and it helps channel some of the excitement.  So for this time of year and the Easter holiday, I decided to create a unit that would accomplish the same things.  

This unit begins with some informational reading about rabbits including fact cards with real photos and a student mini-book.  I have used the fact cards projected on my screen and have also printed them out and had them available for students to look through.  They love the authenticity that the real photos bring.  


I also use the student mini-book for small group reading and for students to search for information.  These worksheets are great for helping students learn how to find evidence in the text to answer questions.  


Next we move onto distinguishing facts from opinions.  I have a card sort and also a cut and paste worksheet.  


Bringing vocabulary to life is a huge part of informational literacy.  I use whole group instruction to match the word, definition, and picture.  Then I have students work on the vocabulary book.  For the young ones, like kindergarteners, I included just a word and picture match since reading and writing the definition would be a little much for them.  


Finally, of course, we tie in some writing.  I included a blank mini-book for students to write freely what they learned about rabbits.  There is a flip book where students can write down 3 facts and an opinion.  There are also some writing prompts for students to respond to.  


And how cute is this rabbit?  You can use it with any of the writing options.  


If you have some of the same holiday struggles or are just looking for a fun spring topic to teach, check out this unit.  Just click on the cover below:


Groundhog Day Activities


One thing I just adore about teaching in the primary grades is that we have the ability to expose students to fun themes and holidays throughout the year.  These things are always fun and of high interest to the students.  Even more important though, I really love expanding on these themes and holidays with activities that are jam-packed with learning.  It's a win-win because the kids are working on topics that are fun and interesting, the teachers have fun planning and also get to hit the standards at the same time, and of course administrators are happy that it's not all just fluff.  

When I create a pack, I try to be sure I am including activities that are exciting for the students, but also worth your instructional time.  With this pack I started with some informational reading about these little guys we call groundhogs, or as they will learn are also called woodchucks or whistle-pigs. 


I started including these Fact Cards with real photos in some of my other thematic units like Reindeer and Penguins, and I have gotten tons of comments and feedback from teachers that this was their students' favorite part of these packs!  I have to agree -- my kiddos love it too!  These sheets can be printed off and laminated to show students, or can be projected from your computer so students can read along.  The second option is what I usually do because it offers students a different media to learn from and switches things up a bit.  After reading and learning together, we move on to some comprehension.  I kept the comprehension simple in this pack because I know we don't have all that much time to devote to only groundhogs, but I think you'll find that it is just enough to show students how to gather information from texts.  

The next part is an informational mini-book about the actual day of Groundhog Day.  This is perfect for shared reading and can be followed by buddy reading or independent reading for further practice. 


 Once students are thinking about whether or not the groundhog will see his shadow, we start making our predictions.  I use these chart pieces to create a class graph where students can predict what they think will happen on Groundhog Day.  Then we all fill out a graph to show what the class chose.  I also have the students do a quick writing about their prediction.  I included this writing page, along with two other options without a sentence starter and different writing lines.


Along with the informational reading I do, I always like to tie in some fictional reading as well.  There are some really cute read alouds for Groundhog Day, but my favorite is Go to Sleep, Groundhog! by Lucy Cox.


I made two different sequencing activities to go with this book.  One is a quick picture cut and paste worksheet, and the other is a cute flip book which is also cut and paste with events from the story.  Choose whichever one you have time for and fits your students' abilities.  I also made a blank sequencing flip book that you could use with any groundhog read aloud you choose.


Finally, I like to have some filler activities for these days to use either in centers, for morning work, or just for fun.  I made a couple printables for math and sight words.  I also made a groundhog page topper if you'd like to use it for a bulletin board or it can also be used as a cute hat.  

I can't wait to get started on the Groundhog Day fun tomorrow in my classroom.  If you think you could use some of these activities too you can grab it in my Teachers Pay Teachers Store by clicking on the picture below.  


I don't know about you, but I am ALWAYS hoping Puxsutawney Phil DOES NOT see his shadow so we can have an early spring.  Where I live that really never happens though.  We're happy if it stops snowing by April (sometimes May).  So if you are someplace warm -- send me some of that! :)


Animals in Winter: Hibernation, Migration, and Adaptation


Hey friends!  Just popping in to tell you about one of my favorite units we do this time of year - Animals in Winter.  It's pretty cold up here in my neck of the woods right now.  So I figure if it has to be sooooo cold outside, we might as well have a little fun with winter inside.    Here is a quick overview of what this unit looks like.  And if you stick around till the end you will find a little FREEBIE too :)  

 First up in this unit is an Informational Mini-Book for shared reading.  There is a color copy for you to use as the teacher and a black and white copy to make for students to have their own.  I packed in a ton of important information in this book so your kiddos will be learning a lot.  Good time for an impromptu observation by your principal.  
Here's what it looks like in action:


Speaking of being observed. . . I'm sure your principals like to see the Common Core standards in action. So I included a bunch of practice to hit those reading for information standards.  You're welcome!

Included in those standards is learning new vocabulary, so that's in there too.  There's pieces to use when teaching the vocabulary and then a student book to fill in.  


Next up - writing.
There's papers for your students to write about what they learned and make their own book.  There's also templates for a class book about what kind of animal your kids would want to be in the winter and why.  


I also wrote a little fact filled song called Winter's Here.  

Finally, I included some center activities and printables to complete this thematic unit.   


 I hope you will find this a useful unit too.  Click on the cover below to check it out on TpT.  


And as I promised - here is a little sampler freebie for you.  To grab this freebie, just click on the picture below.


Thanks for stopping by and joining me for a little cleaning break this weekend.