
Summer is slowly slipping away from you, but hopefully you are excited to get into your classroom and start decorating and organizing. As much as I love my summer vacation, I still (after 16 years) look forward to setting up my classroom for a new group of kiddos. This post is part of a series of blog posts about Back to School Organization. In the first post I gave you 4 tips for Decorating your K-1 Classroom and showed some pictures of a few of my classrooms I have had over the years. I also linked a FREE checklist to help you decide what to decorate your walls with. If you want to go to that post first, click HERE.
If you're sticking around here for a minute, then I'll get right to it. This post is about organizing your teacher supplies in your classroom. I'm talking about all the lesson plan materials, copies, office supplies, and just STUFF that teachers need. After 16 years, I have A LOT of STUFF!!! But even if you are just starting out teaching, you still might inherit a lot of stuff from the teacher before you and you will need to sort through it all before organizing it all. I have a few tips to help you do just that.

1. Take everything out and sort it on your tables/desks in your classroom.
I like to sort things by subject area (reading, math, etc) and then by categories like office supplies, teacher tools, guided reading supplies, etc. Then I go through and decide if I am keeping it or tossing it --- or possibly putting it in the teacher's room for others to grab because one person's trash is another's treasure, right?
This is definitely an important tip if you are moving into a new classroom and you need to get to know what you have in the room, but this is also something you should be doing even if you've been in your classroom for many years. As I explained in my last post, I have changed classrooms 8 different times since I started teaching. Each time I had to get an inventory of what was in the classroom and what I had to add to it. However, I also try to inventory my materials each summer even if I am staying in my classroom because if it's something I haven't used in a year then I either need to move it to a different location so I remember it's there or get rid of it. Let me warn you though, taking everything out can become very overwhelming and it will look like your room is a complete disaster. But I promise you will be happy you did it when you go to put things back into their places. In my opinion, organization is an endless cycle and is never quite perfect. As you grow, you change in how you teach, your priorities, and what materials are given to you or you purchase yourself. Summer is a time to assess and reset!
2. Decide how and where you plan to organize your materials. MEASURE your shelves and cabinets to help find the best storage containers for your space.
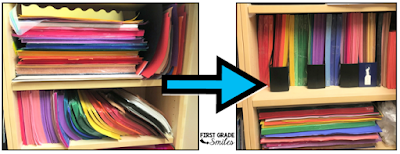
This one is tough to give too much direction with because every classroom is different. Each classroom has a different layout, different furniture, and different cabinets and shelves. But one thing that is a must is to measure first before you buy storage containers so they will fit in your space. Here is a picture of some shelves in my current classroom. They are very shallow so most of the bins that I already had were an awkward fit.

On the left you can see one way I tried to use bins I already had, but then the extra space on the right side of the shelf was pretty much wasted because I couldn't fit much else there and I ended up just shoving things in there. But once I measured I found that I could use these bins from the Dollar Tree and fit 2 bins on each shelf. Not as much wasted space and not a very expensive change.
This next picture also shows how I used something that fit my shelf to organize my construction paper. These are black plastic magazine file holders and the construction paper not only fits perfectly in them, but they also fit perfectly on my shelf. Now I just need to get a couple more and I will be able to organize the rest of the paper.
I like to scower Pinterest looking for organization ideas and pictures, but in the end you have to do what works in your space.
3. Create a Teacher Corner in your classroom.
Now this tip is something that works for me and my organization, but maybe this isn't your thing and that's ok. Personally, I like to have my desk in a corner of the room where I can utilize the shelves and counters around me for some other supplies that students won't need to access. You can see in this first picture (although it's a little washed out because the sun was streaming in when I took this) that I created a teacher corner that utilized the counter under the cabinets and the shelves and counter by the window. I loved this teacher corner because I had everything I needed at my fingertips! Some of you might not have a desk anymore or maybe use your kidney table as your desk, but you can still create a corner for your lesson plan materials and copies so they are organized. I also pointed out in this picture where I would keep my daily copies (those M-F bins are from Really Good Stuff) and my monthly copies or extra copies I have yet to use are in the plastic drawers under the counter. I keep all of this in my teacher corner along with my laptop, plan book, calendar, and sub bin. I like having it all in one place and then students don't need to access that area for anything and the rest of the classroom is theirs.

These next pictures are in my current classroom. The first one shows my teacher corner behind the bookshelf that has the students' book boxes on it. I can use the shelves and counter behind me.
This year I turned my desk against the wall and was able to move my kidney table closer and gained a little more space. I have lesson planning materials and copies on the shelves near my desk and then I have all my guided reading materials right next to that and behind my kidney table.

4. Organize as you go throughout the year.
When you are just starting out or maybe changing grade levels, it's tough to keep all your new materials organized. When I switched to Kindergarten a few years back I decided to go with binders to keep my copies in for each month. Prior to that I used files in a file cabinet. I must say, I really like binders! The best thing about migrating over to binders was I got rid of my file cabinet in my room so now I have more space.
I got these binder covers from Haley O'Connor. I place a master copy of every paper we use in the binders. This way I can just grab a binder and head on down to the copy machine or send out for copies when I'm ready.
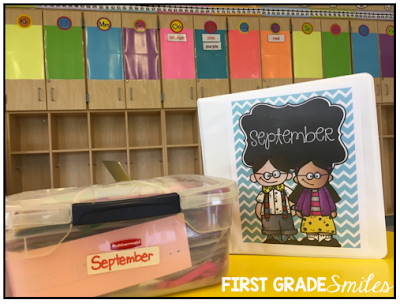
I also have these (picture above) clear plastic Rubbermaid bins where I keep things like seasonal crafts, centers, pocket chart pieces/sentence strips or activities for that month that can't fit in a binder. Looks like I need to step up my label game with those bins though. :-0 But sometimes you just slap on any old label because it's all you have time for -- am I right?
Here are a few pictures of my closet where I keep my binders and monthly bins---BTW this is the first classroom where I have had a closet and I think it makes me waaaaaaaay more happy than it probably should! :-) But just look at the space! Every teacher DESERVES a closet!!
If you're sticking around here for a minute, then I'll get right to it. This post is about organizing your teacher supplies in your classroom. I'm talking about all the lesson plan materials, copies, office supplies, and just STUFF that teachers need. After 16 years, I have A LOT of STUFF!!! But even if you are just starting out teaching, you still might inherit a lot of stuff from the teacher before you and you will need to sort through it all before organizing it all. I have a few tips to help you do just that.

1. Take everything out and sort it on your tables/desks in your classroom.
I like to sort things by subject area (reading, math, etc) and then by categories like office supplies, teacher tools, guided reading supplies, etc. Then I go through and decide if I am keeping it or tossing it --- or possibly putting it in the teacher's room for others to grab because one person's trash is another's treasure, right?
This is definitely an important tip if you are moving into a new classroom and you need to get to know what you have in the room, but this is also something you should be doing even if you've been in your classroom for many years. As I explained in my last post, I have changed classrooms 8 different times since I started teaching. Each time I had to get an inventory of what was in the classroom and what I had to add to it. However, I also try to inventory my materials each summer even if I am staying in my classroom because if it's something I haven't used in a year then I either need to move it to a different location so I remember it's there or get rid of it. Let me warn you though, taking everything out can become very overwhelming and it will look like your room is a complete disaster. But I promise you will be happy you did it when you go to put things back into their places. In my opinion, organization is an endless cycle and is never quite perfect. As you grow, you change in how you teach, your priorities, and what materials are given to you or you purchase yourself. Summer is a time to assess and reset!
2. Decide how and where you plan to organize your materials. MEASURE your shelves and cabinets to help find the best storage containers for your space.
This one is tough to give too much direction with because every classroom is different. Each classroom has a different layout, different furniture, and different cabinets and shelves. But one thing that is a must is to measure first before you buy storage containers so they will fit in your space. Here is a picture of some shelves in my current classroom. They are very shallow so most of the bins that I already had were an awkward fit.

On the left you can see one way I tried to use bins I already had, but then the extra space on the right side of the shelf was pretty much wasted because I couldn't fit much else there and I ended up just shoving things in there. But once I measured I found that I could use these bins from the Dollar Tree and fit 2 bins on each shelf. Not as much wasted space and not a very expensive change.
This next picture also shows how I used something that fit my shelf to organize my construction paper. These are black plastic magazine file holders and the construction paper not only fits perfectly in them, but they also fit perfectly on my shelf. Now I just need to get a couple more and I will be able to organize the rest of the paper.

I like to scower Pinterest looking for organization ideas and pictures, but in the end you have to do what works in your space.
3. Create a Teacher Corner in your classroom.
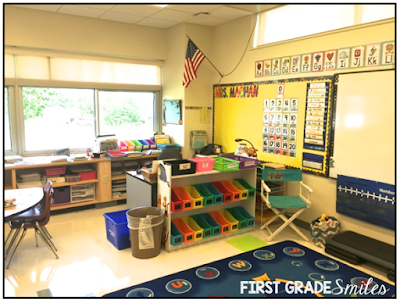
Now this tip is something that works for me and my organization, but maybe this isn't your thing and that's ok. Personally, I like to have my desk in a corner of the room where I can utilize the shelves and counters around me for some other supplies that students won't need to access. You can see in this first picture (although it's a little washed out because the sun was streaming in when I took this) that I created a teacher corner that utilized the counter under the cabinets and the shelves and counter by the window. I loved this teacher corner because I had everything I needed at my fingertips! Some of you might not have a desk anymore or maybe use your kidney table as your desk, but you can still create a corner for your lesson plan materials and copies so they are organized. I also pointed out in this picture where I would keep my daily copies (those M-F bins are from Really Good Stuff) and my monthly copies or extra copies I have yet to use are in the plastic drawers under the counter. I keep all of this in my teacher corner along with my laptop, plan book, calendar, and sub bin. I like having it all in one place and then students don't need to access that area for anything and the rest of the classroom is theirs.

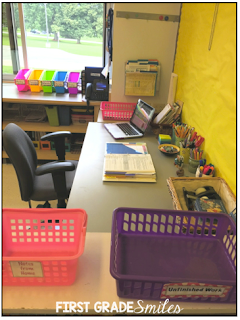
These next pictures are in my current classroom. The first one shows my teacher corner behind the bookshelf that has the students' book boxes on it. I can use the shelves and counter behind me.

This year I turned my desk against the wall and was able to move my kidney table closer and gained a little more space. I have lesson planning materials and copies on the shelves near my desk and then I have all my guided reading materials right next to that and behind my kidney table.


4. Organize as you go throughout the year.
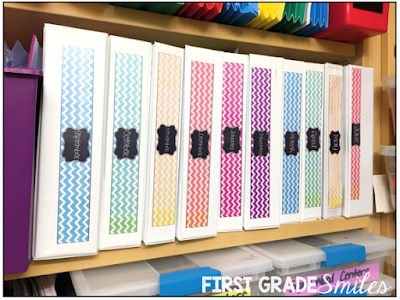
When you are just starting out or maybe changing grade levels, it's tough to keep all your new materials organized. When I switched to Kindergarten a few years back I decided to go with binders to keep my copies in for each month. Prior to that I used files in a file cabinet. I must say, I really like binders! The best thing about migrating over to binders was I got rid of my file cabinet in my room so now I have more space.

I got these binder covers from Haley O'Connor. I place a master copy of every paper we use in the binders. This way I can just grab a binder and head on down to the copy machine or send out for copies when I'm ready.

I also have these (picture above) clear plastic Rubbermaid bins where I keep things like seasonal crafts, centers, pocket chart pieces/sentence strips or activities for that month that can't fit in a binder. Looks like I need to step up my label game with those bins though. :-0 But sometimes you just slap on any old label because it's all you have time for -- am I right?
Here are a few pictures of my closet where I keep my binders and monthly bins---BTW this is the first classroom where I have had a closet and I think it makes me waaaaaaaay more happy than it probably should! :-) But just look at the space! Every teacher DESERVES a closet!!

You can see the binders with monthly papers, but I also have binders for Math, ELA, Science, and Social Studies on other shelves in the closet.

The picture above shows the bins and next to them are my monthly themed books. If you look really close you will see a red heart hanging from one of the bins.....that was placed there by my oldest daughter when she was in my classroom one day. It says: I love you Mommy so much! I keep it there because it makes me smile everytime I see it. :)
You can also see in the closet under my monthly binders I have these paper size snap bins with centers in them. This is one of the results of taking everything out and doing an inventory of what I had before I moved into this classroom and what was left for me. After taking it all out and sorting it on my tables, I measured and found these bins to store them.


And just a couple more pictures of some of my cabinets. I have most of my office supplies in my desk area, but here I have whatever I don't use on a daily basis but still need. I know lots of people have those really cute Teacher Toolboxes with cute labels, but I have never had a classroom where I would have space for something like that so I use these small plastic drawers because they fit almost anywhere.

Putting the time in during the summer and then throughout the year to get organized and STAY organized in important.
I have one more little tip to share with you ----- If you place bins on a shelf or baskets on a shelf and don't want them to be pushed over by one of your kiddos as they are leaning, then cut up those Contact paper Grip shelf liners and place them under the bin so they don't slide easily. It really works and you don't even see them underneath the bins.


I hope you were able to find some helpful tips to get organized in your own classroom. If you are looking for more tips for Back to School and Classroom organization.....check back to see more posts in this series. Sign up to receive emails when I make a new blog post.
Happy organizing!!! :-)


